Everything you need to know about Kryll.io — Part 1

All other parts here:
Part 2: Basic strategies and explanations
Part 3: Adapt your strategies to the market
Part 4: How to make the best out of Kryll.io
You are now using Kryll but you are a bit lost? It is time to go deeper into the platform! And what better way to introduce you to Kryll.io than presenting you every block you can use? And don’t you worry, way more blocks are coming your way!
Let’s get started!
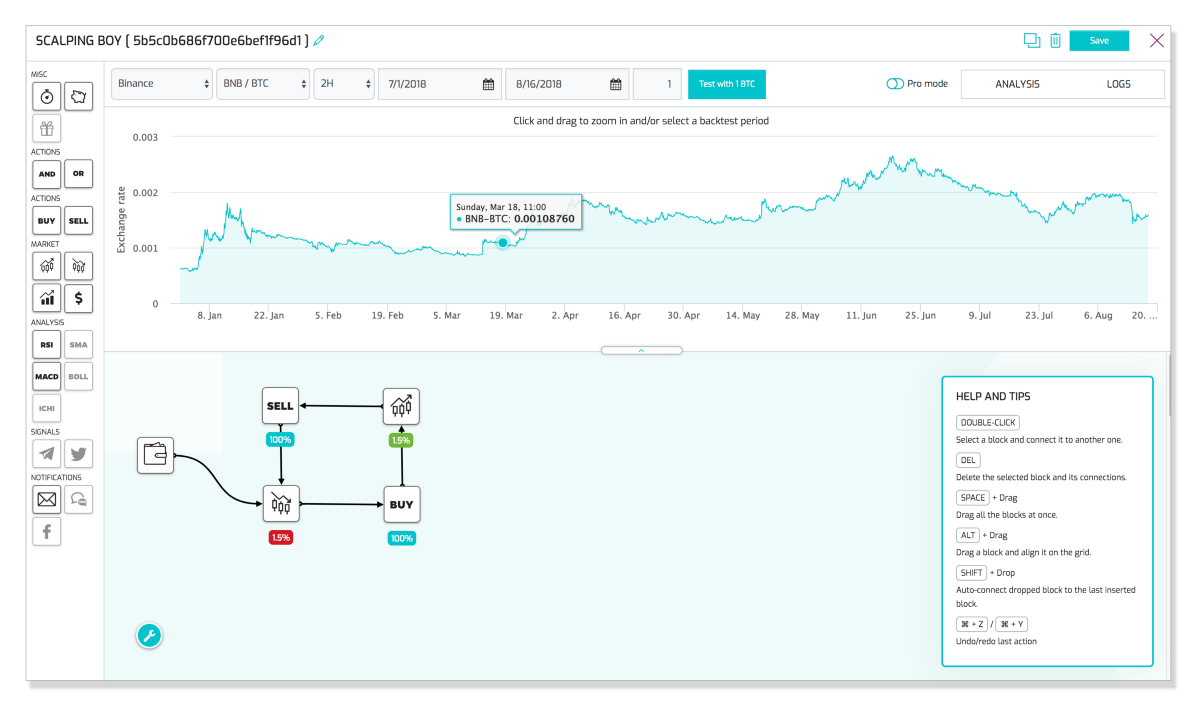
The Editor
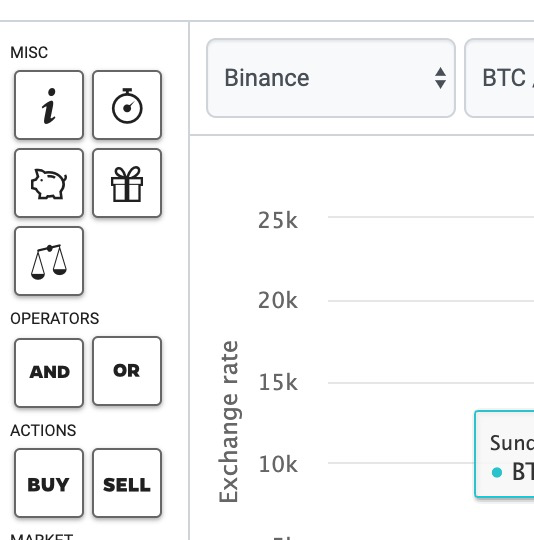
The editor have a toolbar on the left, this is where you'll have to pick-up the bloc to build your strategy:
Few tips
Add a block to the workbench: Drag and Drop the block from editor to the bench
Select a block: Double-click on it in the bench
Link blocks: Select a block then click on the block to link
Unlink blocks: Select the link (double-click) then press Del
Use AND block: Drag AND block to the workbench then drag a block from the editor into the AND block on the workbench
Basic Blocks

WALLET — This block is the starting point of your strategy, it represents your strategy portfolio. A strategy must begin by the wallet.

PRICE UP — This block is a conditional block that is triggered when the price pumps for the percentage you chose. You can either choose :
- Market Evolution: Depends on the market price evolution.
So if the price drops for example 20% and then goes for example 10% up (the trigger you set), it would still be triggered.
- Last Order Price: Depends on the Last Order Price.
For example if you chose 10% and your strategy had purchased a coin at 0.1BTC, this block will be triggered if the price reaches 0.11BTC.
- Last Block Price: Depends on the Last Block Price.
This means that this block will be triggered if the price has gone up to the percentage you chose in comparison to the price at last block that your flow encountered. This mode can be useful for loops and dynamic stop-loss/take-profits…
- Average Buy Order: Average buy on last orders.
This block will trigger if the price reaches the average of the orders made before.
Example : you bought 4 Ethers at the following prices: 1ETH for $200, 2ETH for $250 and 1ETH for $184, your average purchase price is then $221.
This block will therefore be triggered on an increase of x% over the $221.
Ideal for a controlled profit taking.


PRICE DOWN — This block acts exactly like the PRICE UP block. Except it is triggered when the price drops.

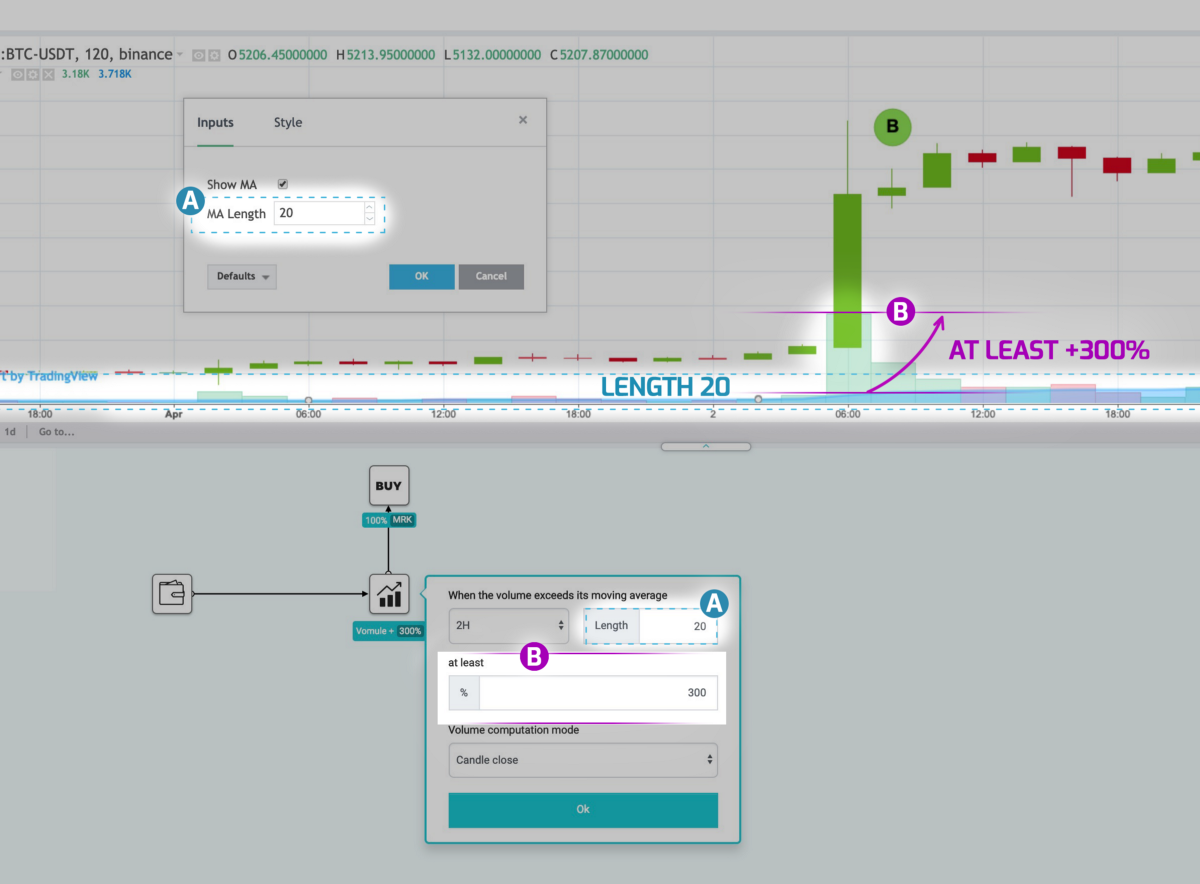
VOLUME— This block is a conditional block that is triggered when the volume increase or decrease by a certain amount of percentage that you set compared to its MA (Moving Average) that you can choose.
- Length : Length of the MA Volume (you can help yourself with the pro mode to display it in the charts) the Block VOLUME will use.
- At least : This is the % value to be set for the block to trigger, when the volume value reaches this threshold in relation to the MA, the block will trigger.
-Real Time : The volume is compared in real time.
-Candle Close: The volume is compared with the close of the last candles. This is a less risky approach.
In the figure bellow, we can see the MA set to 20 (A). When the volume value (B)exceeded 300% above the MA value the block was triggered and placed a buy order via the BUY block.

PRICE TRIGGER — This block is triggered whenever the value of the coin is below or over the price that you set. The price is not only in dollar, it is in the pair you are trading with.

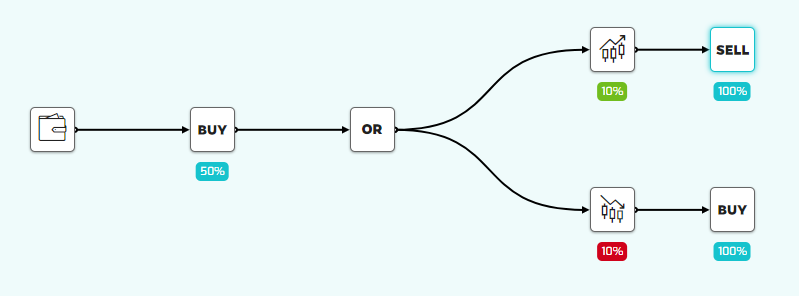
OR — This block acts like a “OR”. It is a conditional block that takes a route or another depending on what is first encountered. You can only connect a OR block to conditionals blocks. A OR block can obviously contain more than 2 conditions.

AND — This block acts like a “AND”. It is a conditional block that is triggered if and only all the conditions in the AND block are met.
Note: To add a block to the AND block, just drag it from the toolbar on the left of the editor to the AND block.

BALANCE - This block allows you to do an action based on the status of your wallet.
This one is pretty self explanatory.
Reminder: On a pair such as KRL/BTC the base currency is BTC and the traded currency is KRL.
This block can be useful in a strategy where you buy small percentage. Because it will come a point where 5% of 10% is too little of an amount to be handled by the exchange.
Action Blocks

BUY — This block is the BUY action. With this block, you can buy a certain amount of the coin you chose. This amount will depend on the percentage you chose.
In the BASIC SETTINGS, you can select two types of order :
- Limit order: Place an order at the price the BUY block is triggered.
- Market buy: Place a market order at the time the BUY block is triggered.
In the ADVANCED SETTINGS you can select the expiry type of your order :
- Till complete: as long as your order is not 100% completed the BUY block will wait.
- Timeout: After a certain amount of times that you select, the order will return to the block you specified in the BLOCK ID section except if a part of your order has been filled. If that is the case, the flow will continue in its logical order. To select a Block ID, just click on the input zone and then on the wanted block.

SELL — This block is the SELL action. It has the same properties as the BUY block. Except it SELLS what you bought with the strategy.
Indicator blocks

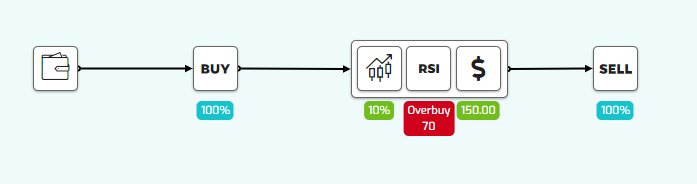
RSI — This block uses the well-known momentum indicator RSI (Relative Strength Index). If you want more information on what is RSI, you can go check the Investopedia page and read the Tradingview wiki tricks.
This block can be very useful on many strategies, as the RSI is reflecting the truth on the market, nothing can be overbought or oversold forever.
This block is triggered whenever some conditions are met :
- ANALYSIS PERIOD: The period that RSI will take into account (If you choose 4H, RSI will use 4H candles).
- LENGTH: This is the length( in candles of the period you chose, so 20 * 4h = 20 4h candles = 3.3 days) on which the range is based on.
-OVERBUY: whenever the RSI is in an overbought status according to your settings (period, and percentage) the block is triggered.
- OVERSELL: whenever the RSI is in an oversold status according to your settings (period, and percentage) the block is triggered.
- NEUTRAL: whenever the RSI is in a neutral status (between overbuy and oversell) according to your settings (period, and percentage) the block is triggered.

MACD — This block is linked to the momentum indicator “Moving Average Convergence Divergence”. You can get more info on MACD on Investopedia and learn how to use it on the Tradingview wiki.
This block is good in a strategy that will depend on the state of the market (bullish or bearish) and can help you to direct your strategy flow in the right direction!
You can select the analysis period you wish, as well as every length that compose the MACD indicator (slow, fast and signal) for maximum optimization.
This block can be tuned from several parameters:
Analysed line :
- Signal Line : The block will focus on the behavior of the MACD against the Signal line.
- Zero Line : Zero Line Crossovers occur when the MACD Line crosses above or below the Zero Line (go from negative to positive [bullish] or from positive to negative [bearish]).
Trigger type :
- Crossover : If you chose this setting, whenever the MACD line crosses the ‘Analysed Line’ depending on the signal you wish (Bearish or Bullish), the block is triggered.
- Position : If you chose this setting, whether the MACD line is above or below the ‘Analysed Line’ depending on the situation you wish (Bearish or Bullish), the block is triggered.

Reminder:
In Bullish signal type:
Zero ligne: When MACD line is above 0
Signal: When Signal line is above the MACD line
Check more about MACD indicator here: https://www.tradingview.com/wiki/MACD_(Moving_Average_Convergence/Divergence)

This is a conditional block based on the %B indicator. This block allows you to trigger the sequence of actions of your flow according to the values of this indicator.
Analysis period: The period that BOLL will take into account (If you choose 4H, BOLL will use 4H candles).
Trigger type: Position or Crossover
— Position: Triggered when signal is above or below the analyzed band
— Crossover: Triggered when signal cross the analyzed band (middle, top or low)
Signal type: Define the type of signal to be analyzed, below or above selected band.
Analyzed Band: Select the type of band you want to analyze, the middle band (SMA), one of the 2 deviations band upper or lower.
Percentage: Minimum percentage to validate the Position, Crossover trigger.
More on Bollinger Bands here : https://blog.kryll.io/bollinger-band--block/

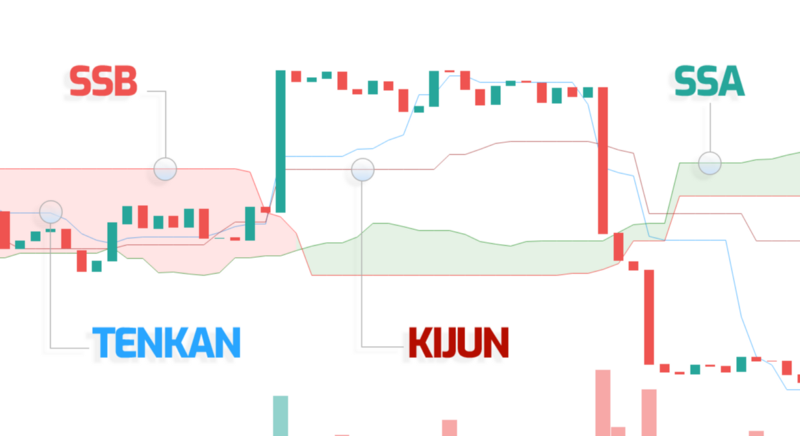
This is a complex conditional block based on the famous Ichimoku indicator. This block allows you to trigger the sequence of actions of your flow according to the values of this indicator.
We do not recommand using this block if you don’t know ichimoku in the first place, as it can be failry complicated and is not as “straight forward” as other indicators.
However here is a quick guide to better understand this indicator :
- SSA (Lead 1 on tradingview) and SSB(Lead 2 on tradingview) forms the Kumo Cloud, SSA is the thick green line and SSB is the thick red line
- Kijun (Base line on tradingview) is the thin red line.
-Tenkan ( Conversion Line on tradingview) is the thin blue line.
You can learn more about Ichimoku on Investopedia
Analysis period: The period that Ichimoku will take into account (If you choose 4H, Ichimoku will use 4H candles).
Trigger type: Position or Crossover
— Position: Triggered when the analyzed line is above or below the compared line
— Crossover: Triggered when the analyzed line crosses the compared line(depends on the “compared to” section)
Analyzed line: This is the first line you have to choose on the settings. You can choose between : SSA, SSB, Kijun, Tenkan and Price.
Compared line: This is the line that the analyzed line will be compared to. You can choose between : SSA, SSB, Kijun, Tenkan and Price.
Settings:
- Conversion Line Periods: Periods on which the Tenkan (Conversion line) is based on.
- Base Line Periods : Periods on which the Kijun (Base Line) is based on.
- Lagging Span 2 periods : Period on which the Lagging Span 2 is based on.
- Displacement: Linked to the Ichimoku indicators displacement.
Note that you can click on the “Advanced Settings” button to enable the settings of your two different lines. If it is not activated, the block will take the same settings for both lines.

This new block allows you to trigger an action based on the position of the price compared to the HH (Higher High), LL(Lower Low) or Median Price. But a picture is worth a thousand word so here is how it looks.
As you can see you have multiple settings, here is how they are used :
Analysis period: As always, it is the period you want to base your analysis on.
Length: This is the length( in candles of the period you chose, so 20 * 4h = 20 4h candles = 3.3 days). on which the range based on.
Price Position: You can choose between Below and Above, changing this setting will determine when you want the block to be triggered.
Related to: You can choose HH(the highest price ever achieved on the last x candles), LL(the lowest price ever achieved on the last x candles), or median price (the median price of the last x candles).
Distance Threshold: This is the minimum percentage by which the price needs to be compared to your settings.
Tool blocks

TIMER — This block has 3 different uses depending on where you place it in your strategy :
- Alone : It acts as a wait, when the period you set end, your flow continues.
- Connected to a “AND” : At least the amount of time you set must have passed to continue the strategy flow.
- Connected to an “OR” : If the other blocks connected to the OR block are not met after the time you set on the timer, continue towards your timer.

PIGGY BANK — This block will save a part (of your choosing) of your profit out of your strategy wallet. In other words, the funds will not be accessible by this strategy anymore. Use this block to secure your profits.
With this block you can choose two types of savings :
- Base currency profits : You will save a part of what you started with (for example in KRL/BTC, you will save BTC)
- Traded currency profit : You will save a part of what you are buying with your strategy (for example in KRL/BTC, you will save KRL)

NOTE: The amount saved by the PIGGY is an integral part of the strategy and is therefore added to the current capital for the purpose of calculating fees.

EMAIL — This block will send an email to your account address whenever your strategy’s flow goes through this block. The email will contain the log, the title of the strategy, the exchange, the pair and the price at the time of the email. This block does not work during backtest obviously.
E-mails works for:
- Live Test
- Live Trading

GIFT — Enjoying Kryll.io? You can tip us by sending some KRLs for a pizza or a drink! Every single KRL will be used for the greater good ❤️. Just connect this block in your strategy and choose how much KRL you wanna gift.

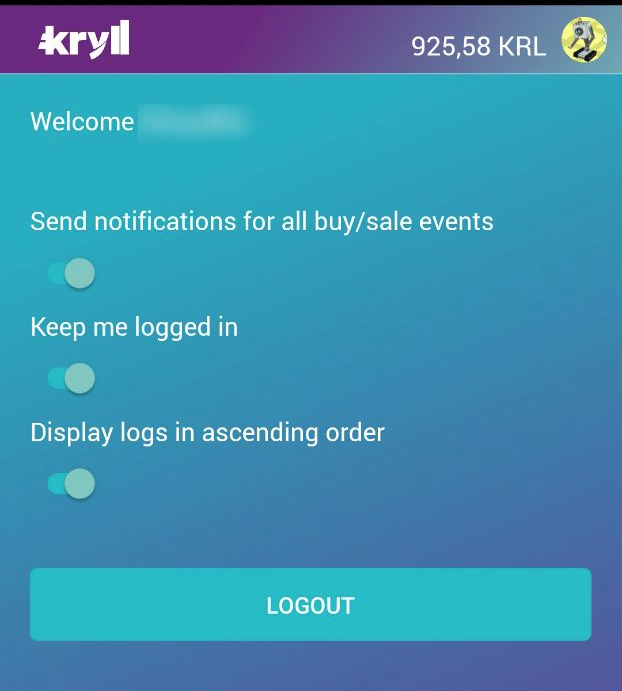
NOTIFICATIONS — This block allow to send notifications to your Kryll Companion App whenever your strategy’s flow goes through it. You can download the app for Android & iOS. This block prevents you from missing anything!
Note: Notifications works both in live simulation and live testing. They are deactivated during Backtests.
You must have activated notifications on your Kryll app in Settings panels.

This block simply allows you to add a line in the log whenever the block is triggered. It will also give you the price and your wallet status.
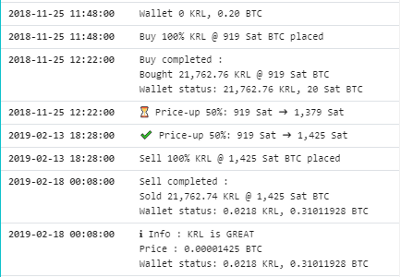
This block can be useful when you are fine tuning your strategy, and you want to know which block is triggered when, it does not slow your backtest at all.
Before you go…
Stay tuned on the telegram to participate in the development! Your voice does matter!
Just so you remember, the Kryll.io platform is coming with :
- No strategy creation limit, create and backtest as much as you need to optimize your brand new strategies!
- New blocks to make your strategies even more powerful.
- Pro Mode to enhance your designs.
- Kryll is cloud-based so live strategies are running as long as you need them to, even while sleeping, eating or even playing.
Our website: https://kryll.io
Twitter : @Kryll.io
Telegram : https://t.me/kryll_io
Facebook : https://www.facebook.com/kryll.io
Guide: https://kryll.zendesk.com/hc/en-us